> ## Documentation Index
> Fetch the complete documentation index at: https://docs.usevelo.ai/llms.txt
> Use this file to discover all available pages before exploring further.
# The Velo home screen
> Start a video from a recording, a file, a link, or a prompt — and pick up where you left off.
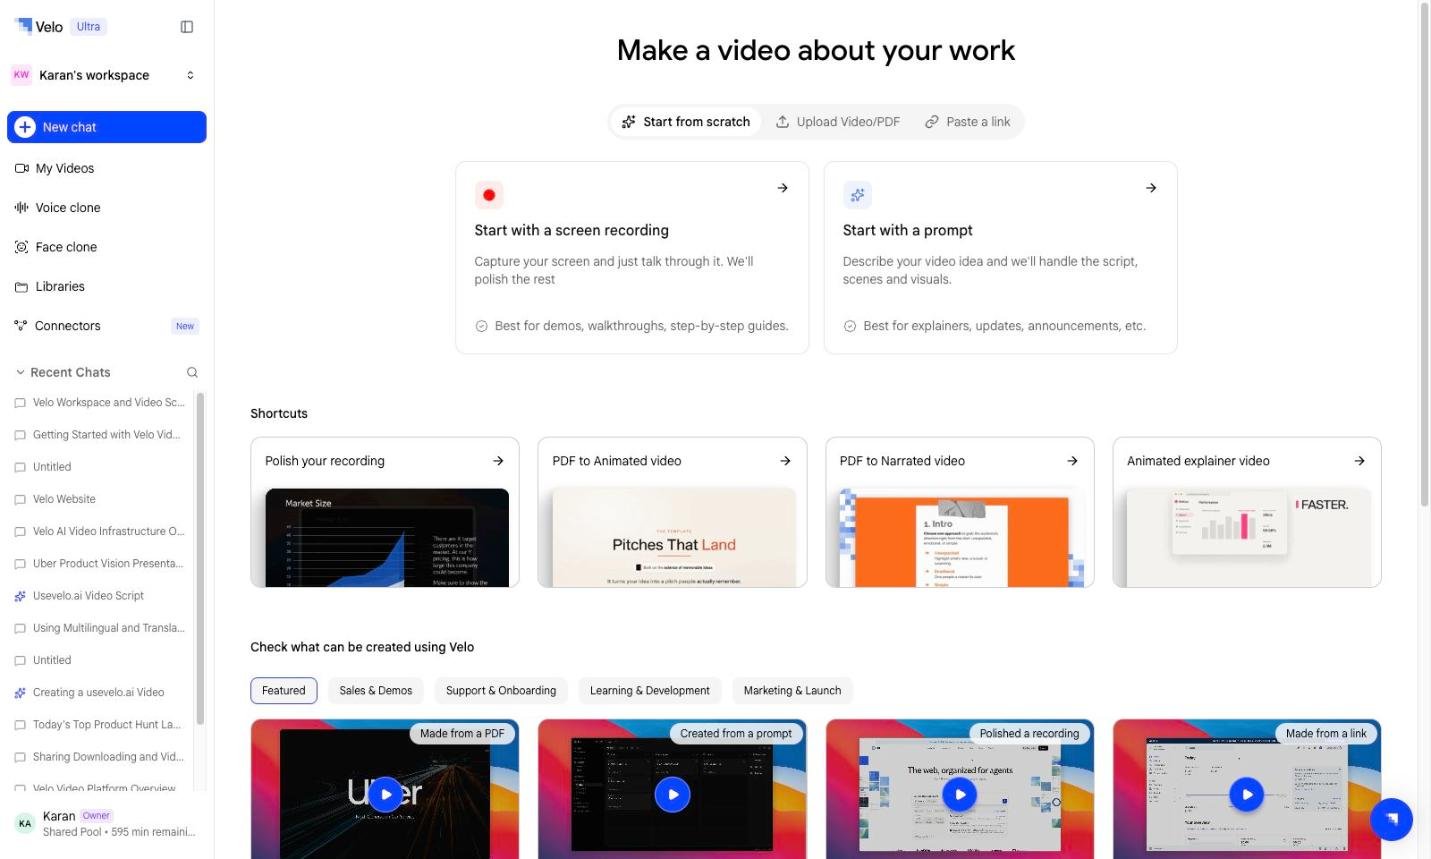
Signing in to Velo lands you on the home screen, headed **Make a video about your work**. Everything starts here.
 ## Choosing where to start
Three tabs above the main cards set what you are starting from:
| Tab | Start from |
| ---------------------- | ------------------------------------------------------------------------- |
| **Start from scratch** | A screen recording you make now, or a written prompt |
| **Upload Video/PDF** | A file you already have — an existing recording, a slide deck, a document |
| **Paste a link** | A live URL for Velo's browser agent to walk through |
Under **Start from scratch**, two cards split the two ways of beginning with nothing:
* **Start with a screen recording** — capture your screen and talk through it. Best for demos, walkthroughs, and step-by-step guides. See [Capture screen](/creating-a-velo/capture-screen).
* **Start with a prompt** — describe the video and Velo handles the script, scenes, and visuals. Best for explainers, updates, and announcements. See [Prompt to Video](/prompt-to-video/overview).
## Shortcuts
Below the cards, **Shortcuts** are preconfigured starting points for common jobs, so you skip straight past the setup questions:
* **Polish your recording** — clean up an existing screen recording
* **PDF to Animated video** — turn a document into an animated explainer
* **PDF to Narrated video** — turn a document into a narrated walkthrough
* **Animated explainer video** — build an explainer from a prompt
## Examples
**Check what can be created using Velo** shows finished videos grouped by team — **Featured**, **Sales & Demos**, **Support & Onboarding**, and **Learning & Development**. Each is tagged with how it was made (*Made from a PDF*, *Created from a prompt*, *Polished a recording*, *Made from a link*, *Captured on Velo*), so you can trace an output you like back to the path that produced it.
## The sidebar
The left sidebar carries the rest of the workspace:
| Item | What it holds |
| --------------- | --------------------------------------------------------------------------------------------- |
| **New chat** | Starts a fresh session |
| **My Videos** | Every video in the workspace, with [analytics](/creating-a-velo/video-analytics) on each card |
| **Voice clone** | Your [voice clones](/velotwin/voice-clone), workspace voices, and public voices |
| **Face clone** | Your [face clones](/velotwin/face-clone) |
| **Libraries** | [Libraries](/workspaces/libraries) for grouping videos |
| **Connectors** | [Knowledge bases, MCP servers, and applications](/prompt-to-video/connectors/overview) |
**Recent Chats** below them lists your sessions so you can reopen one and keep working. The workspace switcher sits at the top, and your plan and remaining balance at the bottom.
## Choosing where to start
Three tabs above the main cards set what you are starting from:
| Tab | Start from |
| ---------------------- | ------------------------------------------------------------------------- |
| **Start from scratch** | A screen recording you make now, or a written prompt |
| **Upload Video/PDF** | A file you already have — an existing recording, a slide deck, a document |
| **Paste a link** | A live URL for Velo's browser agent to walk through |
Under **Start from scratch**, two cards split the two ways of beginning with nothing:
* **Start with a screen recording** — capture your screen and talk through it. Best for demos, walkthroughs, and step-by-step guides. See [Capture screen](/creating-a-velo/capture-screen).
* **Start with a prompt** — describe the video and Velo handles the script, scenes, and visuals. Best for explainers, updates, and announcements. See [Prompt to Video](/prompt-to-video/overview).
## Shortcuts
Below the cards, **Shortcuts** are preconfigured starting points for common jobs, so you skip straight past the setup questions:
* **Polish your recording** — clean up an existing screen recording
* **PDF to Animated video** — turn a document into an animated explainer
* **PDF to Narrated video** — turn a document into a narrated walkthrough
* **Animated explainer video** — build an explainer from a prompt
## Examples
**Check what can be created using Velo** shows finished videos grouped by team — **Featured**, **Sales & Demos**, **Support & Onboarding**, and **Learning & Development**. Each is tagged with how it was made (*Made from a PDF*, *Created from a prompt*, *Polished a recording*, *Made from a link*, *Captured on Velo*), so you can trace an output you like back to the path that produced it.
## The sidebar
The left sidebar carries the rest of the workspace:
| Item | What it holds |
| --------------- | --------------------------------------------------------------------------------------------- |
| **New chat** | Starts a fresh session |
| **My Videos** | Every video in the workspace, with [analytics](/creating-a-velo/video-analytics) on each card |
| **Voice clone** | Your [voice clones](/velotwin/voice-clone), workspace voices, and public voices |
| **Face clone** | Your [face clones](/velotwin/face-clone) |
| **Libraries** | [Libraries](/workspaces/libraries) for grouping videos |
| **Connectors** | [Knowledge bases, MCP servers, and applications](/prompt-to-video/connectors/overview) |
**Recent Chats** below them lists your sessions so you can reopen one and keep working. The workspace switcher sits at the top, and your plan and remaining balance at the bottom.