> ## Documentation Index
> Fetch the complete documentation index at: https://docs.usevelo.ai/llms.txt
> Use this file to discover all available pages before exploring further.
# Write a Prompt
> Transform a static PDF into a narrated, scene-based video by uploading your file and providing context for the AI agent.
Velo allows you to transform static PDF documents into narrated, scene-based videos. By uploading a file and providing specific context, the AI agent generates a structured script and voiceover tailored to your target audience.
## Initial File Upload
**Step 1:** From the main dashboard, select **Upload a recording or PDF**.
**Step 2:** Choose the desired PDF file from your local machine.
.png?fit=max&auto=format&n=Rr1R_9ovDeX34qDf&q=85&s=6506af30e10c65f7da04998e843fcdc6) The upload interface for MP4, MOV, and PDF files.
## Configuring AI Instructions
Once the PDF loads, you must define the scope and tone of the explanation.
**Step 3:** Choose which pages to include. You can select **All pages** or specify a range.
**Step 4:** Enter **Instructions for the agent** to set the professional tone. For example, you can prompt the agent to "Explain this PDF like a customer success engineer."
**Step 5:** Select **Continue with prompt** to allow the system to analyze the document content.
The upload interface for MP4, MOV, and PDF files.
## Configuring AI Instructions
Once the PDF loads, you must define the scope and tone of the explanation.
**Step 3:** Choose which pages to include. You can select **All pages** or specify a range.
**Step 4:** Enter **Instructions for the agent** to set the professional tone. For example, you can prompt the agent to "Explain this PDF like a customer success engineer."
**Step 5:** Select **Continue with prompt** to allow the system to analyze the document content.
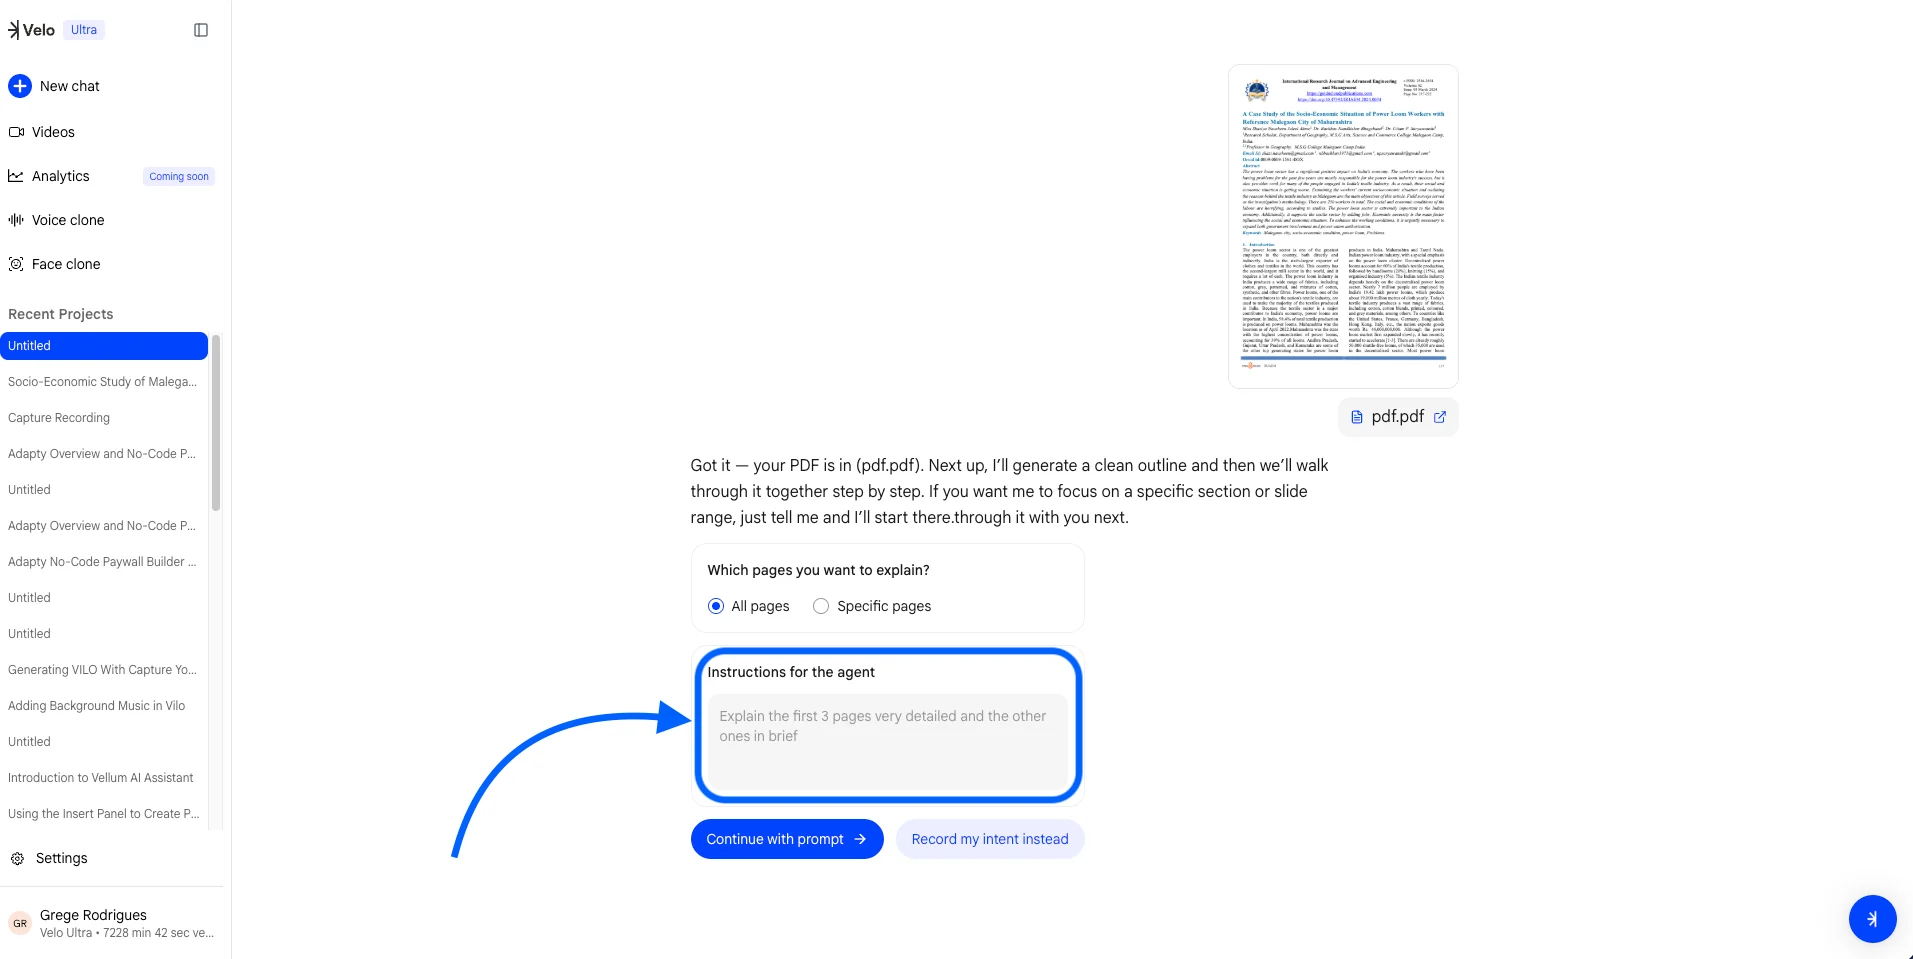 Defining the page range and agent instructions.
## Defining Persona and Audience
To ensure the generated voiceover resonates with viewers, the system requires specific setup details.
**Step 6:** Select a persona for the voice to carry, such as **Customer Support**, **Founder**, or **Product Manager**.
**Step 7:** Identify the primary audience, such as **Customers**, **Internal team**, or **Management**.
**Step 8:** Provide any additional context if necessary, then click **Submit**.
Defining the page range and agent instructions.
## Defining Persona and Audience
To ensure the generated voiceover resonates with viewers, the system requires specific setup details.
**Step 6:** Select a persona for the voice to carry, such as **Customer Support**, **Founder**, or **Product Manager**.
**Step 7:** Identify the primary audience, such as **Customers**, **Internal team**, or **Management**.
**Step 8:** Provide any additional context if necessary, then click **Submit**.
.png?fit=max&auto=format&n=Rr1R_9ovDeX34qDf&q=85&s=fe1be7cc4717f10e023bd334c9c65fe6)
.png) Choosing a persona to drive the script's voice and tone.
## Voice Selection and Script Review
After the initial setup, you can customize the audio and review the auto-generated scenes.
**Step 9:** Choose between a **Public Voice** or a personalized **Voice Clone**.
**Step 10:** Review the generated script. The AI divides the content into distinct scenes.
**Step 11:** Edit the narration text for any scene that requires adjustment.
Choosing a persona to drive the script's voice and tone.
## Voice Selection and Script Review
After the initial setup, you can customize the audio and review the auto-generated scenes.
**Step 9:** Choose between a **Public Voice** or a personalized **Voice Clone**.
**Step 10:** Review the generated script. The AI divides the content into distinct scenes.
**Step 11:** Edit the narration text for any scene that requires adjustment.
.png?fit=max&auto=format&n=Rr1R_9ovDeX34qDf&q=85&s=5f9e039b758c90bbf5decfc745cd6ba5)
.png) The scene-by-scene script editor for fine-tuning narration.
## Finalizing Video Generation
Once the script and scene breaks are approved, initiate the final production phase.
**Step 12:** Click the "**Go, Make my Velo"** button at the bottom of the editor.
**Step 13:** Monitor the progress bar as the system matches the new audio to the visual scenes.
The scene-by-scene script editor for fine-tuning narration.
## Finalizing Video Generation
Once the script and scene breaks are approved, initiate the final production phase.
**Step 12:** Click the "**Go, Make my Velo"** button at the bottom of the editor.
**Step 13:** Monitor the progress bar as the system matches the new audio to the visual scenes.
.png?fit=max&auto=format&n=Rr1R_9ovDeX34qDf&q=85&s=638355c419f672429d3747a0e9fffb10)
.png) Final confirmation to begin video generation.
The result is a fully produced video message ready for sharing with your audience.
Final confirmation to begin video generation.
The result is a fully produced video message ready for sharing with your audience.